What is a Sinkhole?
Sinkholes are depressions or holes in the ground formed by the collapse of surface layers, often due to natural erosion, subsurface water drainage, or human activities. These formations can range from small, shallow indentations to massive, dangerous craters that threaten infrastructure and safety. Understanding the types of sinkholes and the processes involved in their formation is essential for effective and safe repair.
Types of Sinkholes
- Dissolution Sinkholes: Caused by the slow dissolving of soluble rock (like limestone) by acidic groundwater.
- Cover-Subsidence Sinkholes: Occur in areas with sandy soil, where gradual erosion causes subsidence.
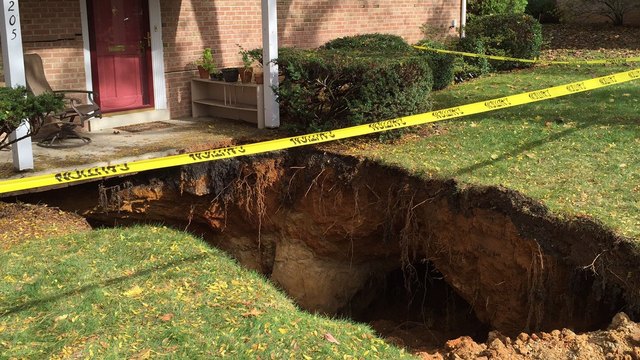
- Cover-Collapse Sinkholes: The most dramatic type, these develop in areas with a thick layer of clay over soluble rock and often cause sudden and catastrophic surface collapse.
Understanding the type of sinkhole is crucial before initiating repairs, as each type may require different approaches.
Step 1: Assessing the Sinkhole
Site Inspection and Safety Precautions
Conducting a thorough inspection is the first and most critical step. This involves measuring the depth and diameter of the sinkhole and assessing its proximity to structures, roads, or other infrastructure. Safety is paramount; therefore, ensure the area is secure to prevent accidental falls or injuries.
- Use Surveying Tools: Professional tools like ground-penetrating radar (GPR) or probes can help in assessing subsurface conditions.
- Check for Water Ingress: If water is accumulating in the sinkhole, it may indicate ongoing erosion or a nearby water source, which could further destabilize the area.
Contacting a Geotechnical Expert
A geotechnical engineer can provide valuable insight by analyzing the soil and rock composition and advising on the best method to repair the sinkhole. This step may save significant time and resources in the long run.
Step 2: Choosing the Appropriate Repair Method
Filling with Grout or Cement
For small to medium-sized sinkholes, injecting a mixture of grout or cement into the sinkhole may be sufficient. This method, known as pressure grouting, involves pumping a specialized mixture that stabilizes the void and hardens to provide a solid base.
- Pros: Quick and effective, particularly for smaller sinkholes.
- Cons: Not suitable for larger sinkholes or those affected by active groundwater flow.
Using Compaction Grouting for Larger Sinkholes
Compaction grouting is a more intensive method, ideal for larger sinkholes or those near sensitive structures. In this process, thick grout is injected under low pressure to compact loose soil and fill the void, increasing soil density.
- Pros: Suitable for large, deep sinkholes and provides long-term stability.
- Cons: Higher cost and requires specialized equipment and expertise.
Constructing a Retaining Wall or Ground Anchors
For sinkholes near critical infrastructure or on steep slopes, additional structural support may be necessary. Retaining walls or ground anchors can help prevent further collapse, stabilizing the area and protecting nearby structures.
- Pros: Offers structural reinforcement for high-risk areas.
- Cons: Typically used only when absolutely necessary due to high costs.
Step 3: Filling and Compaction
Once the sinkhole has been inspected and an appropriate repair method chosen, the next step is filling and compacting the area. This ensures that the sinkhole is stable and will not reopen.
Selecting Fill Material
Using the right fill material is essential for effective sinkhole repair. Here are common materials used:
- Aggregate Rock: Crushed stone or rock provides a solid base, especially for deep sinkholes.
- Sand and Soil Mixture: Often used for shallow sinkholes or as a top layer over rock fill.
- Clayey Soil: Compacted clay helps prevent water infiltration, ideal for cover-collapse sinkholes.
Compacting Layers to Prevent Subsidence
For maximum stability, compact each layer of fill material before adding the next. Use compaction tools or heavy equipment to ensure that the material settles well and provides a firm base.
- Importance of Layered Compaction: By compacting each layer individually, you reduce the risk of future settlement, which could lead to a recurrence of the sinkhole.
Step 4: Monitoring and Maintenance
Repairing a sinkhole is often not the final step. Regular monitoring and maintenance are necessary to ensure that the repair holds and that no new sinkholes develop in the surrounding area.
Checking for Ground Movement
Sinkhole areas should be monitored for ground movement or signs of settling, especially in regions prone to sinkholes or subsurface erosion.
- Install Ground Sensors: These can detect shifts in the ground before they become noticeable on the surface.
- Regular Inspections: Schedule routine checks to detect early signs of erosion or groundwater infiltration.
Managing Water Drainage Around the Site
Controlling water drainage is critical in preventing future sinkholes. Redirect surface water away from the repaired site to avoid further erosion.
- Install Drainage Systems: French drains or swales can help direct water flow and reduce soil saturation.
- Maintain Gutters and Downspouts: Ensure all nearby structures have properly functioning drainage systems to limit water accumulation.
Step 5: Long-Term Prevention Strategies
Taking preventive steps can minimize the risk of future sinkhole formation and help protect property and infrastructure. Implementing long-term prevention strategies is particularly important in regions with soluble rock or areas experiencing frequent heavy rainfall.
Conducting a Soil and Geological Survey Before Construction
Before building any structure on a potentially susceptible area, conducting a geological survey can prevent future complications. This survey should include soil testing and analysis to determine whether the ground can support the proposed construction.
- Benefits of Soil Testing: Identifies weaknesses in soil composition that could lead to sinkholes.
- Understanding Groundwater Flow: Knowing how water moves through the soil and rock can help plan appropriate drainage systems.
Improving Site Drainage Systems
Effective drainage reduces the risk of erosion and water-induced sinkholes. A well-maintained drainage system prevents excessive groundwater accumulation, which is a common cause of sinkhole formation.
- Regular Maintenance: Keep drainage channels and systems clear of debris to ensure proper water flow.
- Using Permeable Paving Materials: For areas with significant rainfall, consider using permeable materials that allow water to pass through instead of pooling on the surface.
Installing Retaining Walls in High-Risk Areas
In regions with steep terrain or loose soil, retaining walls can help stabilize the ground and prevent soil movement. This method is especially useful in high-traffic areas or near structures vulnerable to ground shifts.
- Choosing Durable Materials: Concrete and natural stone walls provide the highest durability and longevity for such installations.
- Consulting Experts: Engaging a geotechnical engineer ensures that retaining walls are appropriately designed to counteract ground pressure.
Cost Considerations and Budgeting for Sinkhole Repair
Repairing sinkholes can range from a few hundred to several thousand dollars depending on the size, depth, and repair method required. It’s crucial to budget realistically and consider potential additional costs for site monitoring and future maintenance.
- Budget for Professional Services: Hiring engineers and geotechnical experts may increase initial costs but can prevent expensive complications later.
- Plan for Maintenance: Setting aside a budget for periodic inspections and drainage maintenance ensures long-term stability.